

Find and Remove Inactive Students
Filter your audience to the students who are not using the platform, review the list, and archive or remove them safely.
If your audience has grown faster than your usage, the recurring question is: who isn’t using the platform, and who should we remove?
This guide walks that loop end to end. Filter, review, act, and keep a record of what happened.
The short version
- Filter to the dormant students. Open Audience and pick a saved view, or build your own filter.
- Export the list. Export it to CSV or Excel and circulate it for sign-off.
- Archive them in bulk. Select all matching, choose Archive, and add a reason.
- Check the result. Undo is available for 15 minutes if the list was not what you expected.
1. Filter to the dormant students
The fastest start is a saved view:
| View | Finds |
|---|---|
| Never logged in | Has an account or a sent invite, but has never signed in |
| Inactive 90+ days | No course activity in 90 days |
| Inactive 180+ days | No course activity in 180 days |
| Enrolled, never started | Has courses assigned but has not begun any |
For anything more specific, combine filters, such as No login in 180 days with Completion, not started. See Filters for the full set.
Two columns tell you whether “inactive” is the whole story. Last Login is when they last signed in; Last Activity is when they last did something in a course. Someone logging in without any activity is a different problem from someone who has vanished. The first may be stuck rather than disengaged.
2. Review before you act
Export the filtered list and circulate it. This is the step that makes the rest safe, because it turns a bulk deletion into a decision somebody signed off.
Use Export as CSV above the table, or the dropdown for Excel. The file follows your filter exactly, so what you send is what you will act on. See Exports.
3. Archive, deactivate, or delete
Once the list is agreed, tick the students you want, or use Select all matching to take everyone the filter returns.
Archive is almost always the right action.
| Archive | Deactivate | Delete | |
|---|---|---|---|
| Access | Removed | Removed | Removed |
| Record kept | Yes | Yes | No |
| Reversible | Yes | Yes | No |
| Plan seat | Freed | Kept | Freed |
- Archive when you want the seat back. It is fully reversible, so it costs nothing to be wrong.
- Deactivate to suspend someone you expect to return, such as a member of staff on leave.
- Delete only when a record must not remain. It requires the student to be archived first.
Add a reason when you confirm. It is stored against every student in the run, so six months later the decision is answerable.
Deleting removes the student from your organization and from every course in it, including their course completion records. Their Edvello account and lesson progress remain, so the work they did is not erased.
4. Check the result, and undo if needed
The confirmation tells you how many students changed and how many were skipped, usually because they were already in that state.
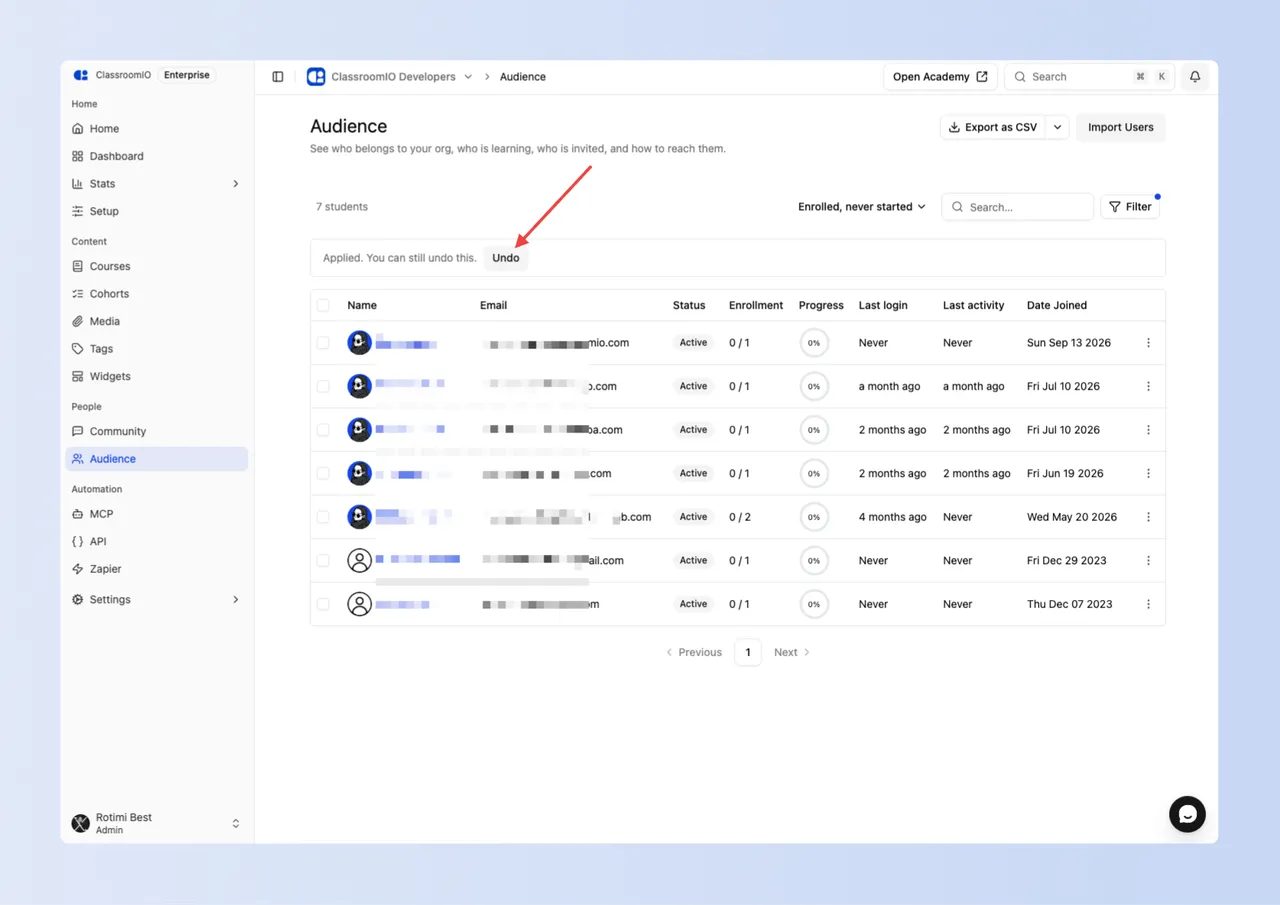
Undo then stays available for 15 minutes after an archive or a deactivate, and applies to exactly the students who changed rather than to a re-run of the filter. If someone else has since acted on one of them, their newer decision is kept.
The Undo button lives on the page. Leaving or reloading before you use it clears the offer, though the change itself is easy to reverse by hand: filter to the state you applied and run the opposite action.
Runs of more than 1,000 students continue in the background so you can keep working. Keep the tab open to see the result, because the notification arrives on this page.
Getting the seats back
Archiving is what reclaims capacity: an archived student does not count towards your plan’s audience limit. Deactivating does not free a seat, which is the main reason to prefer archive when the goal is headroom.
If you archive people and the limit banner does not clear, check that you archived rather than deactivated. The Audience reference sets out the difference.
If you get it wrong
- Within 15 minutes, and still on the page: use Undo.
- Later: filter to Status, Archived, select the students, and choose Unarchive. They return exactly as they were, with their enrolments and results intact.
- After a delete: this cannot be undone. The person can be invited again, but they return as a new member of your organization, without their previous enrolments.
Related guides
- Audience — columns, statuses and the full filter list
- Manage Your Audience — the same tasks as reference
- Exports — formats, limits, and what each export contains
- How the Admin Dashboard Works — org-wide login activity